Home Lab Proxmox Upgrade and using Lenovo/AMD DASH

What is DASH?

This is what Lenovo says

Dash (desktop and mobile architecture for system hardware) is a set of specifications developed by
dmtf, which aims to provide open standards based web service management for desktop and mobile
client systems. Dash is a comprehensive framework that provides a new generation of standards to
protect the security of out of band and remote management of desktop and mobile systems in multi
vendor, distributed enterprise environments. Dash uses the same tools, syntax, semantics, and
interfaces across the product line (traditional desktop systems, mobile and laptop computers, blade
PCs, and thin clients).

https://download.lenovo.com/pccbbs/thinkcentre_pdf/thinkstation_p620_dash_configuration_guide_v1.3.pdf

Why are you using it?

I’ve upgraded my homelab Proxmox instance to a Lenovo ThinkCenter M75q Gen2 with an AMD Ryzen Pro

https://www.lenovo.com/ca/en/p/desktops/thinkcentre/m-series-tiny/thinkcentre-m75q-gen-2/11jn002nus

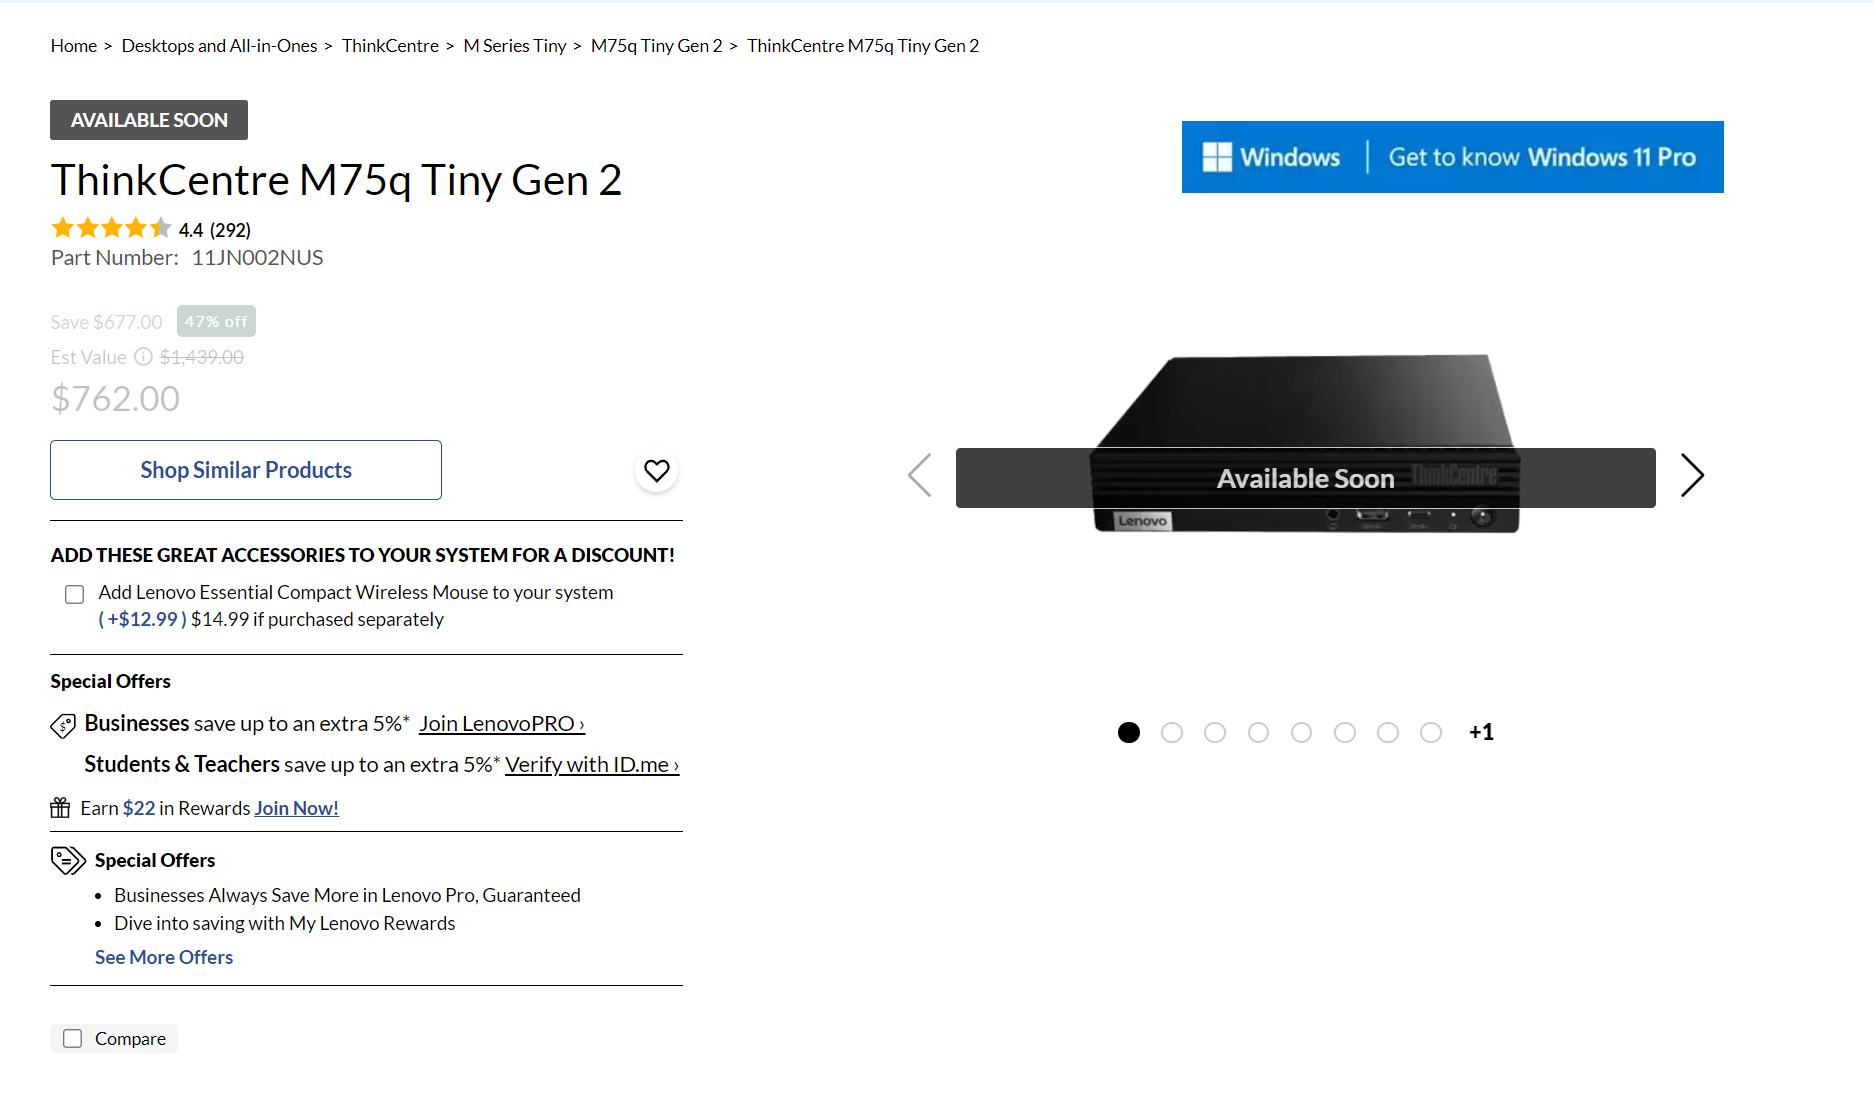
  • Processor: AMD Ryzen™ 5 PRO 5650GE Processor (3.40 GHz up to 4.40 GHz)
  • Operating System: Windows 11 Pro 64
  • Graphic Card: Integrated AMD Radeon™ Graphics
  • Memory: 8 GB Non-ECC DDR4-3200MHz (SODIMM)
  • Storage: 256 GB SSD M.2 2280 PCIe TLC Opal
  • AC Adapter / Power Supply: 65W
  • Networking: Integrated Gigabit Ethernet
  • WiFi Wireless LAN Adapters: Intel® Wireless-AC 9260 2×2 AC & Bluetooth® 5.1 or above

It’s not a bad system, moving from a Dell OptiPlex 7060

  • Processor: Intel(R) Core(TM) i7-8700T CPU @ 2.40GHz
  • Memory: 32 GB Non-ECC DDR4 Memory Non-ECC 2666MHz

Upgrades to the ThinkCenter M75q Gen2

Since there’s only 8GB at purchase, I opted for Non-ECC 32GB kit, the ThinkCenter M75q Gen2 supports up to 64GB but felt that it wasn’t necessary to go 64GB yet. Also I didn’t do ECC as this was a low cost upgrade.

I dropped in a Kingston NVMe v4 1TB drive and a 1TB SSD drive just because I had it laying around.

AMD Management Console Downloads

You will need to download the AMD Management Console

https://www.amd.com/en/technologies/manageability-tools

Setting up DASH

I was able to enable DASH supprt in the BIOS but didn’t find any configuration options.

Additional Resources

Using Monit Environment Variables with exec

If you read the Monit documentation, it tells you exactly how to use Monit environment variables when using exec.

No environment variables are used by Monit. However, when Monit executes a start/stop/restart program or an exec action, it will set several environment variables which can be utilised by the executable to get information about the event, which triggered the action.

https://mmonit.com/monit/documentation/monit.html#ENVIRONMENT

I can be smart, but sometimes I can be daft. You don’t want to use the variables within your monit configuration, but instead, you want to use these variables in your exec script.

Here’s a great example of how to use $MONIT_EVENT. First set up a monit check

check system $HOST-steal
    if cpu (steal) > 0.1% for 1 cycles
        then exec "script.sh"
        AND repeat every 10 cycles

Now here’s script.sh which will use $MONIT_EVENT

#!/bin/bash
echo "Monit Event: $MONIT_EVENT" | mail -s "$MONIT_EVENT" [email protected]

I was in a rush and felt I had to post this to help others who might overlook this.

MikroTik Scripts

Setup SSH Key Login on Mikrotik

Created File and Place SSH Key Contents

Shell

Set SSH Key for Users

Shell

Setup Email Sending on Mikrotik via Postmark

Shell

Send a Test Email from Mikrotik

Shell

Backup Mikrotik Config and Email – Example 1

Shell

Backup Mikrotik Config and Email – Example 2

Shell

Ultimate Linux Shell Guide for Windows 10 – WSL + Terminal + ZSH + oh-my-zsh + Powerlevel10k

Draft

This is a draft article, so it’s incomplete!

Introduction

The following guide will help you install Windows Subsystem Linux, Windows Terminal and ZSH.

Step 1 – Enable WSL

It’s pretty easy to install Windows Subsystem Linux, open Powershell as Administrator, and run the following. The following command will require a restart.

Enable-WindowsOptionalFeature -Online -FeatureName Microsoft-Windows-Subsystem-Linux

Step 2 – Install Ubuntu

Navigate to the Windows Store and search for Ubuntu. You’ll have three options.

You can choose to install Ubuntu 20.04 LTS or Ubuntu 18.04 LTS. However, if you simply choose Ubuntu, you will get Ubuntu 20.04 LTS.

Totally up to you what you pick. Either works.

Once installed, you will have to launch Ubuntu so that it can continue the installation process. You’ll choose a username and password.

Step 3 – Install Windows Terminal

Windows Terminal provides a tabbed manager for all of your various terminals, such as Powershell, Command Prompt and WSL!

You can download Windows Terminal via the Windows Store

Step 4 – Configure Windows Terminal

Windows Terminal has many configuration options that you will find useful. Here are the ones I suggest you configure.

  • Start up -> Default Profile -> Ubuntu
  • Interaction -> Automatically copy selection to clipboard

Step 5 – Fixing the WSL Home Directory Issue

When you launch WSL you’re placed into /mnt/c/Users/<username> versus the typical Linux home directory of /home/<username>

So you’ll have to make one small change.

  • Go into Windows Terminal Settings ( Ctrl + , )
  • Profiles -> Ubuntu -> General
  • Set Starting Directory to: //wsl$/Ubuntu/home/<username>

Step 6 – Install ZSH

You can install ZSH like you would on any Ubuntu system!

sudo apt-get update;sudo apt-get install zsh

Enter in your password and Ubuntu will update it’s cache of packages and install ZSH.

You can then type “zsh” to launch the ZSH shell. You can also set your default shell to zsh by typing “chsh”. However, you will need to know the full path to zsh, and we can find this out by typing “which ZSH”

user@comp:/mnt/c/Users/user$ which zsh
/usr/bin/zsh

Now you can type “chsh” enter your password, and the path to zsh like so!

user@comp:/mnt/c/Users/user$ chsh
Password:
Changing the login shell for user
Enter the new value, or press ENTER for the default
        Login Shell [/bin/bash]: /usr/bin/zsh

Step 7 – Install oh-my-zsh

You can install oh-my-zsh using a one-liner from their website at https://ohmyz.sh or use the command below taken from their website.

sh -c "$(curl -fsSL https://raw.github.com/ohmyzsh/ohmyzsh/master/tools/install.sh)"

Step 8 – Install Powerlevel10k Font

What’s Powerlevel10k? it’s a zsh theme and successor to Powerlevel9k. I love using it. You can see the full installation instructions on Github at https://github.com/romkatv/powerlevel10k

The installation involves installing a supported font and the theme itself. I highly suggest installing the font as you’ll not be able to see all the fancy icons.

If you visit the installation page mentioned above, you’ll find a link to download the font. Here’s a direct link.

https://github.com/romkatv/powerlevel10k-media/raw/master/MesloLGS%20NF%20Regular.ttf

Download the font, double click on the font and press install!

You’ll then need to set up Windows Terminal with the font.

Open Settings (Ctrl+,), under “Profiles” click “Ubuntu” then “Appearance” and set “Font Face” to “MesloLGS NF”. Save, exit and relaunch.

Step 9 – Installing Powerlevel10k Theme

Again, you can refer to the Github page for installation instructions or use the following one-liner for oh-my-zsh.

git clone --depth=1 https://github.com/romkatv/powerlevel10k.git ${ZSH_CUSTOM:-$HOME/.oh-my-zsh/custom}/themes/powerlevel10k

Then you’ll need to set the theme in your .zshrc file, which should be located at the root of your home directory. Here’s a quick screenshot of where the .zshrc should be located after installing oh-my-zshrc.

There should already be a line for ZSH_THEME; simply change it to powerlevek10k

#ZSH_THEME="robbyrussell"
ZSH_THEME="powerlevel10k/powerlevel10k"

Step 10 – Powerlevek10k Configuration

Close your Windows Terminal and relaunch it. You should now be taken through the Powerlevel10k configuration screens. Once complete, you can start using your ZSH shell with oh-my-zsh and the Powerlevel10k theme!

Further Customization

There are tons of configuration options for the Powerlevel10k theme; you can read all about it on the Github repository.

https://github.com/romkatv/powerlevel10k

I’ve actually create my own custom ZSH setup that does most of the work above, except for the font (Step 8). I’ve also add in some custom aliases and commands. It’s very much a WIP!

https://github.com/jordantrizz/zshbop

Enjoy!

Updates

  • 05-09-2022 – Added more detail about .zshrc

Cyberpanel Openlitespeed Issue with PHP Session Files Cleanup on Ubuntu 18

There’s an issue with the Cyberpanel installation using Openlitespeed on Ubuntu 18 where the PHP session files aren’t removed by the system installed.

You might see issues in your /usr/local/lsws/log/error.log like this

HTML

The cause is related to the build of of PHP session files in the /tmp folder, which usually is cleaned out by a cronjob in /etc/cron.d/php that calls /usr/lib/php/sessionclean which of course fails to running correctly due to lsphp nor working as intended.

The solution? Create a cronjob to delete the sess_ files. Here’s an example I found online

HTML

Add this code to a file an placed it in /etc/cron.daily, make sure to chmod u+x so its executable.

That’s it!

Litespeed Web Server Statistics in Netdata Including Fixes

Showing MySQL Metrics in Netdata

It’s pretty simple to get this done, as there’s a plugin built in. As per this guide on the Netdata website.

https://app.netdata.cloud/spaces/lmtca-space/rooms/general/nodes/34d04048-ab58-11ea-81cb-5600029faf80#chartName=menu_ebpf&after=-900&before=0

You simple need to run the following commands to create the necessary configuration.

Plain Text

You then update a single line at the bottom of the file. Set path to /tmp/lshttpd/

Plain Text

After restarting Netdata you might find that there is no change to your dashboard. Let’s check the logs….

Plain Text

Since the file .rtreport is actually symlinked to /dev/shm/lsws/status/.rtreport which is owned by nobdy/nogroup. We simply need to add netdata to the nogroup group.

Shell

You should then be able to see the Litespeed section in Netdata Cloud

Litespeed Netdata Cloud Graphs

Setting up MySQL Statistics in Netdata

MySQL Metrics in Netdata

You might noticed MySQL statistics aren’t being show in Netdata. Here’s what I ran into.

Error: “MySQLdb or PyMySQL module is needed to use mysql.chart.py plugin”

The required python libraries for MySQL are missing, so you simply need to install them. For Ubuntu/Debian the following command should correct it.

Shell

Setting up Netdata MySQL User

You might also see these errors in your log.

Plain Text

The fix is simple, add a user called Netdata with a password. Note, you can setup the Netdata user without a password, but this may expose information to the system that you might not want. Full information is located on Netdata’s website.

https://learn.netdata.cloud/docs/agent/collectors/python.d.plugin/mysql

So let’s get Netdata pulling MySQL data.

Fast, open and potentially insecure no password optiom

This will just work, but leave a user on your MySQL instance without a password.

Plain Text

Password based polling

Let’s run the same command as above but give the user a password.

Plain Text

Now we need to tell Netdata the password.

Plain Text

Instead of editing the defaults, go to the bottom of the config and just create a new section with the following

Plain Text

Now you should see MySQL metrics in Netdata

View of MySQL Metrics in Netdata

How to Increase Exim4 Logging Information

This is pretty simple to do, the syntax is as follows.

Plain Text

However, depending on your OS, you will need to add this line to /etc/exim.conf or if you’re running cPanel you can follow these instructions.

https://www.limestonenetworks.com/support/knowledge-center/1/62/how_do_i_configure_exim_for_better_logging.html

So You Start netplan Configuration for Additional IP’s

This took way too long to figure out and it’s my own fault as I do have a good understanding of networking.

When you order additional IP’s from So You Start, you’re usually giving IP’s in a different range the main IP address of your server. This might confuse some because of how traditional networking states you have to be in the same subnet as your gateway.

This causes problems for deploying virtual machines when using Xen and Ubuntu 18 as it has moved over to netplan. The problem lies in the fact you shouldn’t be able to reach your gateway out of your subnet.

So you have to do the following so that netplan is able to understand how to add the gateway properly.

Go

Here’s the wonderful thread it came from

https://askubuntu.com/questions/1062406/ubuntu-18-04-server-vps-on-failover-ip-ovh

Xen Ubuntu 18 Guest Creation Using xen-create-image (bionic template and netplan fix included)

So I was having issues with deploying Ubuntu 18 guests on a Xen hypervisor. It originally started with a template for bionic not existing.

This is easily fixed with a couple of commands to copy the karmic.d template to bionic.d template.

However, once your host boots up. You’re now faced with a network issue as Ubuntu 18 added netplan as the default network manager.

This is fixed by replacing the /usr/share/xen-tools/40-setup-networking file with a new xen-tools 4.8 release.

Here is the github comment.

Plain Text

You can simply do the above to fix your issue, or install the latest 4.8 xen-tools at https://github.com/xen-tools/xen-tools/releases

Or you could just grab the 4.8 ubuntu package from eoan Ubuntu 19.10 at http://mirrors.kernel.org/ubuntu/pool/universe/x/xen-tools/xen-tools_4.8-1_all.deb